Development
Basic Information
HEPData is based on the Invenio Framework which in turn is built using Flask.
HEPData requires:
PostgreSQL (version 16) databases
Redis for caching
Celery for managing asynchronous tasks
OpenSearch for indexing and searching data
Useful links:
Other HEPData Repositories
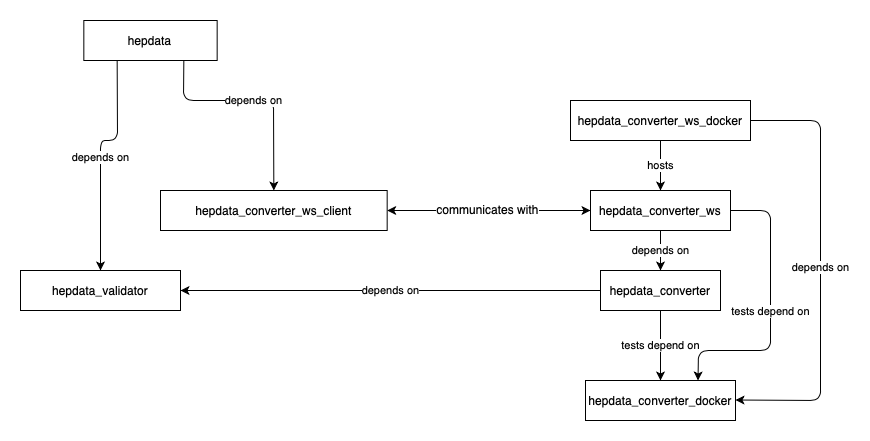
This web application with repository HEPData/hepdata depends on some other packages that can be found under the @HEPData organization on GitHub. These additional repositories are necessary for validation, conversion, and to provide the converter as a web service with a client wrapper. Further repositories build Docker images with the converter dependencies and run the converter web service. See here for more details on how to deploy the conversion software in production. The relation between these different packages is summarised in the following diagram:
JavaScript/Webpack
Introduction
The JavaScript and CSS are bundled using Webpack, via the following packages:
pywebpack provides a way to define Webpack bundles in python.
Flask-WebpackExt integrates pywebpack with Flask. It provides the WebpackBundle class used to define the entry points and contents of the Webpack packages, and the
{{ webpack[...] }}template function used to inject javascript and css into a page.invenio-assets integrates Flask-WebpackExt with Invenio and provides a CLI command to collect the assets.
Each module that requires javascript has a webpack.py file which list the JavaScript files and their dependencies. Dependencies need to be imported at the top of each JavaScript file.
Adding a new JavaScript file
Create the file in
<module>/assets/js.Edit
<module>/webpack.pyand add an item to theentriesdict, e.g.'hepdata-reviews-js': './js/hepdata_reviews.js',
To include the file in another JavaScript file, use e.g.
import HEPDATA from './hepdata_common.js' // Puts HEPDATA in the namespace
import './hepdata_reviews.js' // Adds functions to HEPDATA from hepdata_reviews
To include the file in an HTML page, use the
webpackfunction with the name from'entries'inbundle.py, with a.jsextension. (Similarly, CSS files can be included using a.cssextension.){{ webpack['hepdata-reviews-js.js'] }}
If you need to add a new bundle, it will need to be added to the 'invenio_assets.webpack' entry in setup.py (and you will need to re-run pip install -e.[all] hepdata).
Building JavaScript/CSS assets
To build all of the JavaScript, run:
(hepdata)$ hepdata webpack build
If you have made a change to a webpack.py file, run:
(hepdata)$ hepdata webpack buildall
Occasionally the Webpack build will complete but there will be errors higher up in the output. If the JavaScript file
does not load in the page (e.g. you see a KeyError: not in manifest.json error), check the webpack build output.
When making changes to the javascript you may find it helpful to build the javascript on-the-fly, which also builds in development mode (so the generated JavaScript files are unminified and in separate files):
(hepdata)$ cd $HOME/.virtualenvs/hepdata/var/hepdata-instance/assets
(hepdata)$ npm start
npm dependency issues
If you have issues with npm peer dependencies when running hepdata webpack buildall, (e.g. an error message starting
ERESOLVE unable to resolve dependency tree and followed by Could not result dependency: peer ...) then you will
need to set the legacy-peer-deps flag for npm.
There are two ways to do this:
Either:
Set the flag globally in your npm config (NB: this will affect other npm projects):
(hepdata)$ npm config set legacy-peer-deps true
You will then be able to run hepdata webpack buildall.
Or:
Run the webpack CLI install and build commands separately (rather than using buildall) and pass --legacy-peer-deps to the npm install step:
(hepdata)$ hepdata webpack install --legacy-peer-deps
(hepdata)$ hepdata webpack build
Single Sign On: Local development
CERN SSO
Setting up a local app can be done via the CERN Application Portal. (Ideally you should use the QA version of the portal but we have not yet succeeded in setting that up - but see below for partial instructions.)
(QA only) Set up the CERN proxy following their instructions.
Sign in to the CERN Application Portal (or the CERN QA Application Portal).
- Click “Add an Application” and fill in the form:
Application Identifier: hepdata-local (example, must be globally unique)
Name: HEPData local installation
Home Page: https://hepdata.local (this doesn’t affect the workings of the SSO but localhost is not allowed)
Description: Local installation of HEPData
Category: Personal
- Once your application has been created, edit it and go to “SSO Registration”, click the add (+) button, and fill in the form:
Select “OpenID Connect (OIDC)”
Redirect URI: https://localhost:5000/oauth/authorized/cern_openid/
Leave other boxes unchecked, submit and confirm.
You will be shown the Client ID and Client Secret. Copy these into
config_local.py:CERN_APP_OPENID_CREDENTIALS = dict( consumer_key="hepdata-local", consumer_secret="<your-client-secret>", )
- Go to “Roles”. Add a new Role:
Role Identifier: cern_user
Role Name: CERN user
Description: CERN user
Check “This role is required to access my application”
Check “This role applies to all authenticated users”
Leave the minimum level of assurance as it is.
If there is a default role, edit it and uncheck both “This role is required to access my application” and “This role applies to all authenticated users”.
(QA only) Add the following settings to
config_local.py:from .config import CERN_REMOTE_APP CERN_REMOTE_APP['params']['base_url'] = "https://keycloak-qa.cern.ch/auth/realms/cern" CERN_REMOTE_APP['params']['access_token_url'] = "https://keycloak-qa.cern.ch/auth/realms/cern/protocol/openid-connect/token" CERN_REMOTE_APP['params']['authorize_url'] = "https://keycloak-qa.cern.ch/auth/realms/cern/protocol/openid-connect/auth" CERN_REMOTE_APP['logout_url'] = "https://keycloak-qa.cern.ch/auth/realms/cern/protocol/openid-connect/logout" OAUTHCLIENT_CERN_OPENID_USERINFO_URL = "https://keycloak-qa.cern.ch/auth/realms/cern/protocol/openid-connect/userinfo"
Run the hepdata app using an adhoc SSL certificate:
(hepdata)$ pip install pyopenssl
(hepdata)$ hepdata run --debugger --reload --cert=adhoc
Go to https://localhost:5000. You will see a warning that the connection is not private but choose “Advanced” and “Proceed to localhost (unsafe)” (or the equivalent in your browser).
Click “Sign in” and “Log in with CERN” and hopefully it will work as expected.
reCAPTCHA: Local development
To use reCAPTCHA on your local register_user form, go to the reCAPTCHA admin console
(you will need a Google account) and add a new site with the following settings:
Label: hepdata-local (or another name of your choice)
reCAPTCHA type: choose reCAPTCHA v2 and then “I’m not a robot” Checkbox
Domains: localhost
You will then be shown your reCAPTCHA keys, which you should set in config_local.py:
RECAPTCHA_PUBLIC_KEY = "<Site Key>"
RECAPTCHA_PRIVATE_KEY = "<Secret Key>"
The reCAPTCHA should now be visible on the signup form.
Adding CLI commands
The HEPData CLI uses click to define commands and
command groups. You can turn a function in cli.py into a new command by annotating it with @<group>.command()
where <group> is the relevant command group, e.g. utils.
You can call your new command via:
(hepdata)$ hepdata <group> <your-function-name-with-hyphens-not-underscores>
e.g. a method called my_fabulous_command annotated with @utils.command() could be called via:
(hepdata)$ hepdata utils my-fabulous-command
The click docs give details of how to parse command-line arguments.
Fixing existing data
Sometimes we need to make changes to data on HEPData.net, to fix issues caused by migrations or by previous
bugs, which are too complex to achieve with SQL or with simple python commands. The HEPData CLI has a
fix group to be used in this situation, which uses code in the fixes directory, separate from the main HEPData
code.
To create a new fix command:
Create a new module file in
fixeswith an appropriate name.Create a function to apply your fix, and annotate it with
@fix.command().
Testing
The automated tests do not cover all scenarios, so manual testing should be done of your local instance. Below are some suggestions of manual tests to carry out if you have been working on a given part of the codebase.
Note that this section is a work in progress and the suggested tests are not exhaustive - please consider adding further tests to this section!
Submission uploads
There are some sample submission files in docs/manual_test_files:
Test steps:
Log in as administrator.
Create a new submission (using any values).
Upload TestHEPSubmission.zip
Should succeed
Should display 8 tables
Click Upload new files and upload sample.oldhepdata
Should succeed
Should show 7 tables
Click Upload new files and upload single_file_submission.yaml.gz.
Should succeed
Should show 5 tables
Click Upload new files and upload TestHEPSubmission.zip again.
Should succeed
Should show 8 tables
Click Upload new files and upload TestHEPSubmission_invalid.zip.
Should fail
No tables should be shown in UI
Error email should give the following errors:
submission.yaml:
Name of data_file ‘mydirectory/data2.yaml’ should not contain ‘/’.
Location of ‘additional_resources’ file ‘../TestHEPSubmission/figFigure8B.png’ should not contain ‘/’.
Missing ‘additional_resources’ file ‘figFigure9A.png’.
data3.yaml
Missing data_file ‘data3.yaml’.
data8.yaml
There was a problem parsing the file: while parsing a block mapping in “data8.yaml”, line 1, column 1 did not find expected key in “data8.yaml”, line 9, column 3
figFigure8B.png
figFigure8B.png is not referenced in the submission.
Upload TestRemoteSubmission.zip.
Should fail
No tables should be shown in UI
Error email should give the following errors in submission.yaml:
Autoloading of remote schema https://scikit-hep.org/pyhf/schemas/1.0.0/workspace.json is not allowed.
Upload single_file_submission_invalid.yaml.gz.
Should fail
No tables should be shown in UI
Error email should give the following errors in ‘Archive File Extractor’:
single_file_submission_invalid.yaml.gz is not a valid .gz file.
Upload single_file_submission_invalid_yaml.yaml.gz.
Should fail
No tables should be shown in UI
Error email should give the following errors in ‘Single YAML file splitter’:
while parsing a flow mapping in “single_file_submission_invalid_yaml.yaml”, line 7, column 11 did not find expected ‘,’ or ‘}’ in “single_file_submission_invalid_yaml.yaml”, line 8, column 3
Click Upload new version and upload TestHEPSubmission.zip again.
Should succeed
Should show 8 tables
